
Your Cart is Empty

Christmas crafts ideas for the budding creatives in your life.
Christmas is a time when families and friends gather together and make happy memories. It’s about starting a new tradition or respecting old ones. Putting the Christmas tree up, adding decorations, making and baking!
There is no better time than Christmas to get our young creatives involved with making Christmas special and by encouraging them to use their imaginations. Making a special card for someone special, creating decorations for the home, baking cookies and mince pies, creating their own wrapping paper, festive hangings and joining in with the creative fun.
We have lots of easy creative ideas to share with you and will link to all the products you will need. You may already have some products or items around the house but if not we will link to our website where you can purchase them to create something new. We are all about recycling, upcycling and repurposing, making something new out of something old.
Easy and Fun projects;
- Christmas village - old cardboard box.
- Christmas wrapping paper and tags - brown paper
- Christmas paper stockings - old A3 envelopes
- Christmas tree decorations or Christmas hanging, pine cones with bows - pines cones and sticks collected from autumn walks, and old hessian fabric.
- Clay Christmas tree decorations
- Paint your own bauble - New product (outsourced bobble) but very fun and will last a long time.
- Pizza Tray Snowflakes - Pizza bases.
Cardboard Christmas Village ( for that additional sparkle add your own fairy lights!)
All you will need for this project is a long piece of cardboard from an old box, a cutting mat with a sharp knife, and a metal ruler. We used a white posca pen with a large bullet nib for all the wide outlining around doors and windows and a small white gel pen for the small details.
Some tracing paper or baking parchment or old plastic sleeves for the back of the windows and some fairy lights for the twinkle! This looks great in the daytime and in the evenings.
Maybe employ an older creative (young adult) for this project, as the craft knife needs to be sharp and a steady hand is needed for cutting out the shapes. You can make up any building shapes you want, or maybe get your young creative to research buildings they like?
- Long piece of cardboard
- Tracing paper or baking parchment; Seawhite Tracing Paper Pad 90gsm 30 Sheets
- Fairy lights, any choice of colour.
- Sellotape; Packaging Tape (Sellotape)
- Small detailing white gel pen; Pentel Hybrid Gel Grip DX White
- Cutting mat; ARTdiscount Cutting Mats
- Sharp cutting knife; Jakar Cutting Knife 7340or Jakar Small Cutting Knife
- We used; Jakar Aluminium Cutting Rulers - Grip Handle


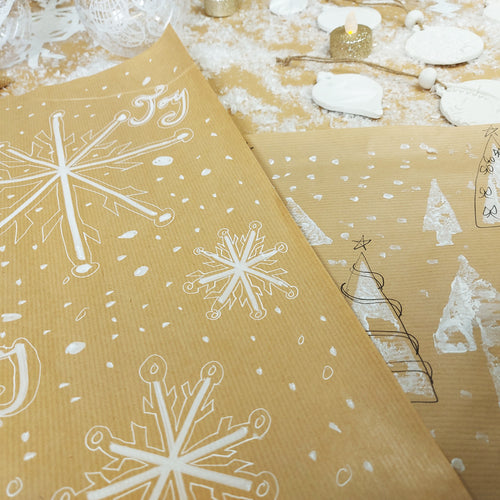
Handmade Wrapping Paper, Paper Stockings and Tags
For our ‘Wintery' themes we used; brown paper, old A3 envelopes for the stockings, white acrylic paint, white, gold and black
Posca markers, black fine liners and white gel pens for details, but you could also use; felt tips, crayons or pencils.
Christmas trees are a great motif to use as you can make up as many different versions as you like! Tall, short, wide, skinny, spiky, fluffy, and so on… and it’s great fun trying to invent different designs.
We also created some potato printing wrapping paper especially for tiny hands (adults need to cut potato shapes first). We used undiluted ARTDISCOUNT STUDIO HEAVY BODY ACRYLIC PAINTS in white, but you could also try our Heavy Body in Silver or Gold? Use a paint brush to apply the white paint onto the potato for even coverage then stamp away. Any random design looks great or if you like more of a regimented look you could pencil straight lines to help you plan your line of trees. Little snowflake dots were achieved using cotton buds dipped in white acrylic paint. Or you could use the little round eraser on the end of a pencil to create some dots.
Make two papers with the same design so you can use one paper for wrapping presents and one for making coordinating tags. Cut out your handmade paper design and stick it to some white card leaving a space for the name. You could just use your matching paper as a border on the white card? Or cover the front of your card whilst leaving the back of the tag blank for writing names? Punch a hole in your tag and use hessian string or ribbon as a bow to attach to the presents.
For the little paper stockings we used old A3 brown envelopes and drew a stocking shape on the front, cut them out and stitched them together but leaving the top open so you can slip your little creative fillers inside.
wInstead of stitching the pattern pieces together you could use glue or staples to join the paper and write the name of your loved one on the front? We used white Posca pens and white gel pens to add Christmas baubles, little Christmas trees and snowflake motifs. We finished the paper stocking off with a hessian bow using PVA glue.
- Brown wrapping paper
- Brown or white A3 envelopes
- Potato for stamping
- ARTdiscount Craft Knife or sharp knife for cutting potato print.
- Posca Markers - 2.5mm - 4 Mono Tones - PC-5M
- Posca Markers - 0.9 - 1.3mm - 4 Mono Tones - PC-3M
- ARTDISCOUNT STUDIO HEAVY BODY ACRYLIC PAINTS - 200MLS TUBES
- Uni-Ball Signo UM-153 Broad Metallic Rollerball Pens - Set of 3


Pine/Fir Cone Tree Decorations
This is a very easy and fun Christmas decoration fix. We collected all our old pine cones and simply brushed white paint onto the end tips of the cone and a little bit inside the scales with a soft brush. A soft brush is really good for getting inside the pine cone’s scales and applying just the right amount of paint. You don’t need too much paint, just lightly cover your pine cones so they look like they have a light dusting of snow.
We cut strips of cloth to make no-sew bows out of an old hessian sack for the rustic Christmas look, folded them over and pinched them in the middle securing them with string.
Secure the painted pine cones to the bows with string once they have dried. Leave a little loop at the top for hanging onto the tree! Or you could find a lovely fallen tree branch and create a hanging?
If you want to Bling them up a little, apply a little PVA glue to the ends of the pine cones and dip in white, gold or silver glitter.
- Pine or fir cones and a long stick if making a hanging.
- Soft brush; we used; Chinese Hake Brushes or try these brushes, this is a great set for a great price! Lukas Artists 20 Brush Assorted Selection (Contents Vary)
- Paint palette, we used Winsor & Newton Disposable Tear Off Palettes (9" x 12")
- ARTdiscount Studio Heavy Body Acrylic Paints- 200ml Tubes
- Hessian string or white string
- Old hessian cloth for a rustic feel or if you have a particular colour palette in mind use old scraps of cloth or ribbon.
- Optional; Large Pots of Glitter


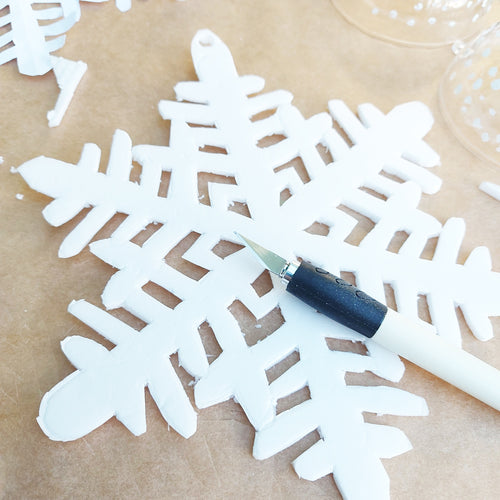
Clay Christmas Tree decorations
Making these beautiful little decorations may look hard but if you take your time they will turn out great and make lovely little gifts or use to decorate your own tree.
We used DAS Modelling Material (White) 1 Kg Bag air dry clay or you can use Newclay Airdrying Light Grey Clay. Great for modelling and sculpting or use for creating little tiles and Tree decorations.
You will need some grease proof paper to roll out your clay onto, a rolling pin (don’t use one that you use for food/baking) or a glass bottle, some cutting tools similar to cookie cutters but bigger and ones you don’t use for food/baking and some items to press into the clay. Good shapes to use are circles, bauble shapes, Xmas Tree shapes.
To make impressions into the clay we used some leaves, sycamore seeds, stencils and a patterned glass bowl.
Start by fixing the baking parchment onto the table with masking tape, and cut the clay open. Once you have opened the clay, manipulate a medium sized amount in your hands to warm up and become soft. Put the unused clay into an airtight container to stay moist.
Once the clay is malleable, roll out onto the parchment paper. Aim to have a consistent depth around 5mm and don’t roll out the clay too thinly or it will become too brittle when dry and crack and you won’t be able to impress a design onto it if it is too thin.
Roll out an area large enough to impress different shapes into it, then taking your shaped cutter decide which areas of your design you like the best then cut your designs out. Remember to put a little hole at the top whilst the clay is still set to pull through a ribbon or string when it has dried. We used a pencil to create a little hole at the top of the bauble shape.
Move your clay decorations somewhere flat, where they can dry without being moved. We left ours on the parchment paper to dry. When you are working with the clay it looks light grey, when the decorations have dried out fully they turn white. We also made some little beads to add to the baubles, threaded onto the hessian string.
Once dried you can embellish them with glitters or varnish them with a coating of gloss, matt or satin varnish. Varnishing your pieces will make them water-resistant and hopefully stronger to handle. Before sealing you must wait at least 72 hours to ensure your pieces are completely dry. If you are creating your pieces with children, you can simply use PVA glue, however a clear polyurethane varnish or an acrylic sealer will create a non-porous transparent layer that seals your clay.
Remember to rinse your tools when you have finished.


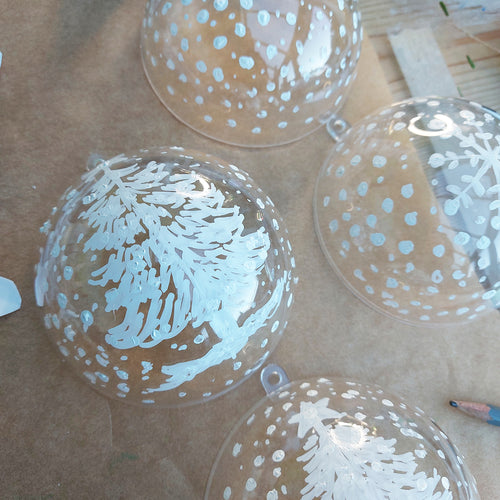
Paint Your Own Bauble
For these Paint your own Bauble we outsourced the clear bauble and used White posca pen to create our images. We kept the designs the same as the wrapping paper to keep everything coordinated.
White posca pen with a medium to small nib was great for drawing out the tree and snowflake designs, then we added dots with a cotton bud and used ARTdiscount Heavy Body white acrylic paint.
Leave to dry for about 30 mins.

Create a Pizza Tray Snowflake
Definitely keep your pizza base trays! Perfect for creating snowflakes, just create a paper stencil and trace around it on your pizza tray then cut it out using a good sharp scalpel. Take your time as it is very easy to cut out the little bits you want to keep. Place a hole it the top for string or ribbon.
You can bling it up by adding glitter.

We hope we have given you some great tips and ideas for Christmas Crafts. Join in and let us know what you have made by tagging us on Facebook or Instagram.