0

Your Cart is Empty

EPISODE 7 - WATERCOLOUR for Beginners - 'Creating Watercolour Textures'

EPISODE 7 - WATERCOLOUR for Beginners - 'Creating Watercolour Textures'

  1. EPISODE 1 - Creating a dilution chart
  2. EPISODE 2 - Creating a Colour Chart
  3. EPISODE 3 - Round Brush Techniques
  4. EPISODE 4  - Flat & Fan Brush Techniques
  5. EPISODE 5 - Glazing Techniques
  6. EPISODE 6 - Masking & Resist Techniques
  7. EPISODE 7 - Creating Watercolour Textures
  8. EPISODE 8 - Creating a Landscape painting in Watercolour

Episode 7 - 'Creating Watercolour Textures'

In this episode we will show you how to create texture using non-specialist supplies such as sponges, rock salt and clingfilm. All these techniques are easy and achievable, even for the beginner!

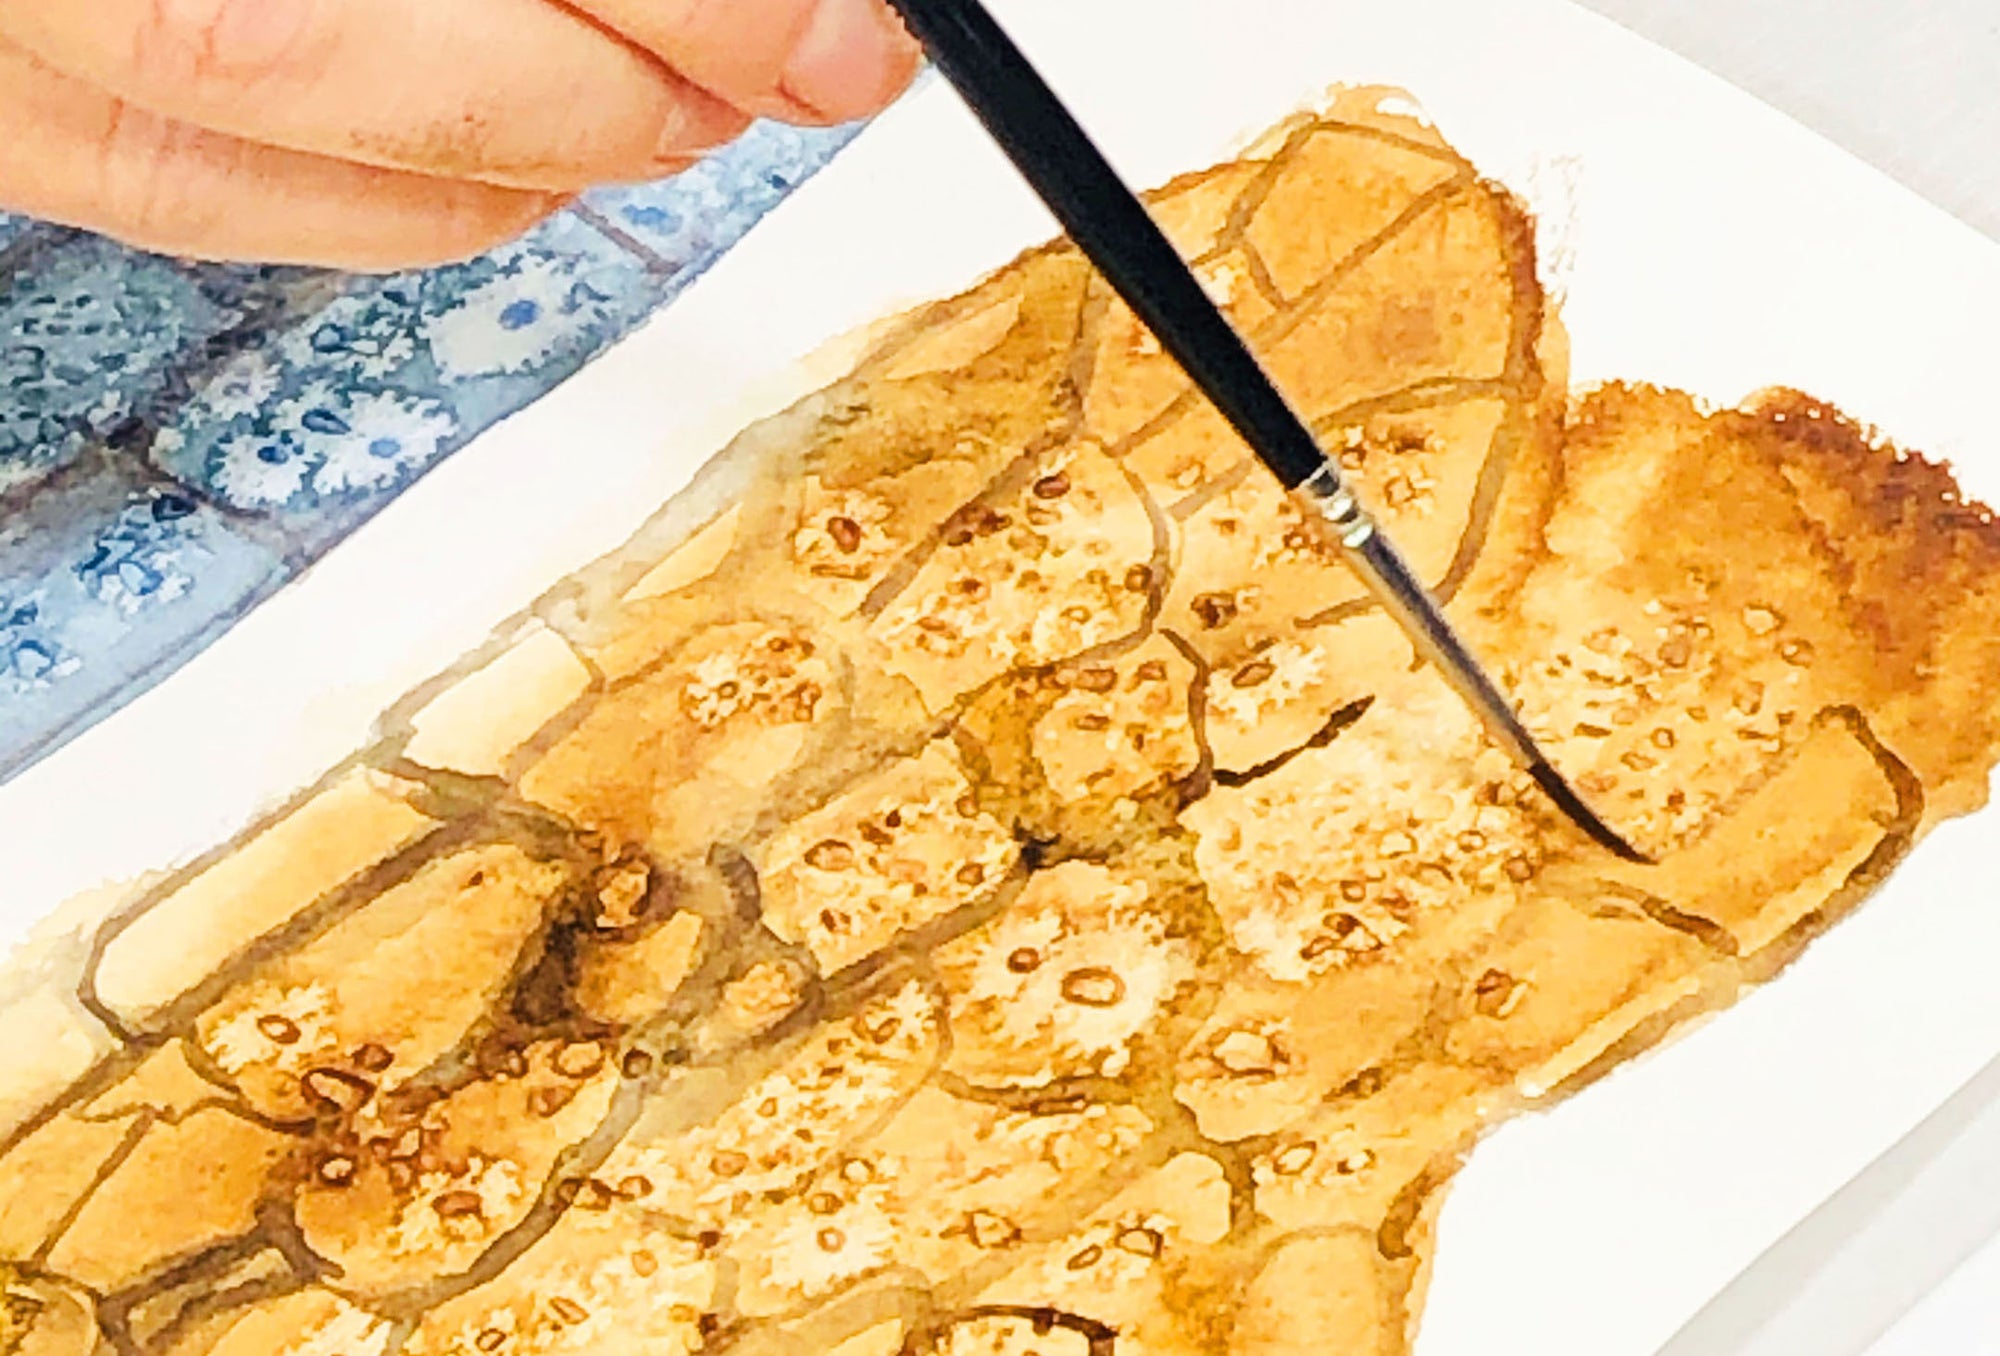
Following on from episode 6, showing you Masking and Resist Techniques, our In-House artist Ellie Jakeman shows you how to create textures for your watercolour artwork. Alongside our ARTdiscount supplies, we have used items from our online collections but you may have similar items at home such as both natural and synthetic sponges, rock salt and clingfilm to create textures such as brick, tree bark, and, woodgrain.

Creating watercolour Textures

How to use sponges to create watercolour texture

Using sponges to create texture can feel more organic than using a brush and sponges can create endless possibilities of shapes and texture by building up colour and tone. Aim to create a texture, investigation sheet, before you commit to a painting. By practising layering techniques you will understand how much pressure you need to create certain types of marks. Different sponges will also provide different textures. Work from a diluted wash of pigment, and then layer up darker colours on top, you can either work wet on dry, letting each colour dry before applying the next colour, or wet on wet if you wish your colours to bleed and bloom into each other. Using a sponge technique is great for creating bushes, trees, rock formations and brick texture.  

How to use sponges to create watercolour texture

How to use rock salt to create watercolour texture 

Rock salt provides a unique texture by drawing up the pigment when added to a wet wash of colour. The large granules of salt lifts the pigment  from the paper as it dries to create blooms and specks for a highly natural and organic look, great for creating rock and brick surfaces, natural stone or sand on a beach seascape. Always wait until the salt has dried completely before brushing off. If you require a smaller textured mark, table salt can be scattered over wet watercolour and brushed off when dry, this will create a texture similar to sand. 

Creating watercolour textures


How to use clingfilm to create watercolour texture

Our last technique if for the adventurous watercolour artist! The texture created using Clingfilm is unpredictable but great to practise. Once you have wet your paper for a wet on wet technique you can add no more than three colours and let them bleed into each other, then lay a sheet of cling film on top. Using more colours would just make it look muddy. Aim to move and manipulate the cling film on top of the pigment. this will create lots of little pockets of colour. Once you are happy with your manipulated sheet, you must leave it to dry over night. When it is completely dry you can remove the cling film to reveal little shards of organic patterns and textures. This makes a great abstract background for a painting, add leaves and more controlled marks to turn it into a semi abstract floral painting? 


Creating Watercolour Textures

Products used in this series:

ARTdiscount Watercolour Sets

ARTdiscount artists value brushes-Round

ARTdiscount Artists Value Brushes-Flat

ARTdiscount Bristle Brushes- Fan

ARTdiscount Watercolour Paper

ARTdiscount Masking Fluid

Jakar Artists Natural Sea Sponges

Frisk Magic Watercolour Sponge Eraser

Ellie Jakeman
Ellie Jakeman

I have had a strong interest in the visual and creative arts since a very early age. After completing an Art and Design Degree and Post graduate studies I have taught Art and Design, Fashion and Textiles, Textile design , Fine Art print and Illustration for over 20 years. Before teaching I was a freelance artist and illustrator and decided 4 years ago I would return to freelance and commissioned work. I have created many domestic and commercial murals for hospitals and hospices. I work part time for ARTdiscount as a content creator and product tester.


Leave a comment

Comments will be approved before showing up.


Also in ARTdiscount Blog

A Buyer's Guide to Artist Pens: Fineliners, Brush Pens, and Alcohol Markers

by Joseph Short May 08, 2024

Technical pens and markers have been a staple of the graphic artist toolbox for many years. In this article, we'll take a look at the wide variety of markers available here at ARTdiscount, and demystify some of the terms and technicalities associated with fineliners, brush pens, and markers.
Read More
Artist Interview: Naomi Jenkin

by Izzy Latimer April 24, 2024

Naomi Jenkin is a Cornwall based pastel artist of whom specialises in creating animal portraits. Her art is heavily inspired by her love of wildlife and the importance of protecting them, which consequently led to Naomi becoming a finalist in the 2022 Wildlife Artist Of The Year!
Read More
Meet MEEDEN; Affordable, High Quality Artists Studio Equipment.

by Ellie Jakeman April 18, 2024

MEEDEN is a company known for providing high-quality art supplies and tools to artists and enthusiasts. They are committed to inspiring creativity and supporting artistic endeavours through their range of products, which include Easels, Artist Supplies storage drawers, Table Easels, and Artists’ Print rack with castors. 

Read More