
Your Cart is Empty
FREE DELIVERY ON ORDERS OVER £50.00 - TO MOST UK POSTCODES
FREE DELIVERY ON ORDERS OVER £50.00 - TO MOST UK POSTCODES
Trees have been the theme and inspiration for artists over many decades! What could be more satisfying than capturing the natural beauty and splendour of a tree or collection of trees! No two trees are completely identical, they all have their individual characteristics, textures, twists and turns, furrows and crevices, leaf and bark patterns, branches stretching to the sky, or lush green, thickly-woven canopies of collective trees and forests.
For this article we are going to look at how to paint a tree in watercolours with a limited palette. This is particularly easy exercise for beginners as you only need to think about two pigments, which will create a third colour and the dilution of these pigments to create a variety of light and dark values and a variety of green and brown colours.
You don't need lots of different colours to begin with and if you are just starting out as a beginner, a limited palette would be a great place to start. when painting trees.
Suggested colours to buy singularly in tubes would be;
Alizarin Crimson | Cadmium Red | Cadmium Yellow | Lemon Yellow | Yellow Ochre | Ultramarine Blue | Prussian Blue | Burnt Sienna or Burnt Umber | Raw UmberThese warm and cool primary colours once mixed, will provide you with a good range of secondary and tertiary colour schemes and palettes. Practising mixing colours and creating colour charts are a great way to learn about how colours affect each other and how to manipulate and create shades, value and vibrancy. To desaturate and mute your colours you can also add small amounts of complementary colours to each other i.e. blue to orange, red to green or purple to yellow and vice versa. You would only add very small amounts of pigments to each other to adjust your colour values. (to make them lighter, brighter or darker or muted)
Alternatively if you are really stuck there are many beginners watercolour sets you can try. For the tree studies I have used the Cotman Sketchers Pocket Box set of 12 colours. Which is both affordable, compact and transportable. This is a student set but the colours are vibrant and intermixable.
Watercolour paint sets for beginners:
Watercolor paper is available in different weights and comes in three different surfaces; rough texture, hot-pressed (smooth surface) and cold-pressed or NOT (medium texture), this paper has been specifically created for watercolor painting. For organic themes the rough or cold-pressed papers are the most compatible. Aim to work on paper that is no less than 90lb/ 200gsm.
Watercolor paper which is 140lb (300gsm) is generally the best when you are just starting off. Watercolour paper which is 100% cotton is the most reliable paper to work on and does give the best results, however an acid-free, archival wood-pulp and cellulose fibre mix would be suitable for beginners and intermediates whilst experimenting with colour charts and practising techniques.
Below are some examples of watercolor pads for beginners perfect for painting trees.
Masking fluid is a medium which can be applied to the paper to retain the white of the paper. It can be painted over once it has dried and will resist the watercolour paint. Great for retaining sunlight on branches, leaves, foliage and bark. Can be applied with a ruling pen, brush (coated in a little soap first to save the brush from spoiling but don’t use your best brushes) or cotton buds or even use a sponge dipped in masking fluid to apply random highlights to foliage. Masking fluid must be used before painting and left to dry completely before painting onto. It can be removed when the paint is dry by lightly rubbing with your finger or a soft eraser. If the white of the paper is a little too white, dilute some of the pigment around this area and pull it softly into your white shape, this will soften the edges and brightness.
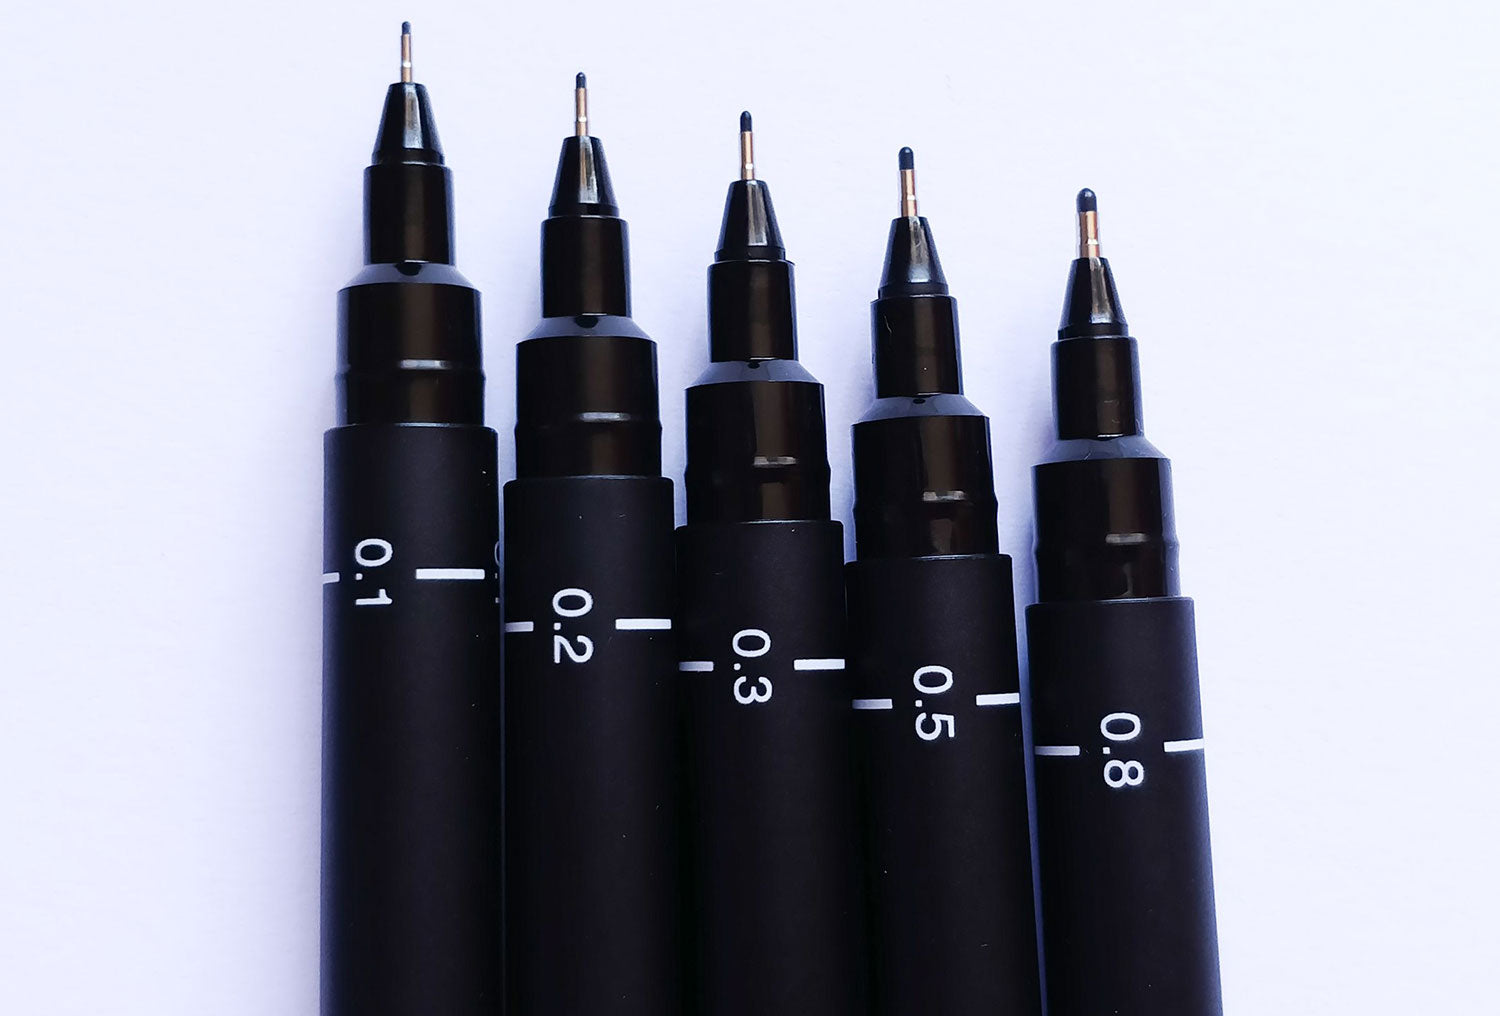
Ruling pen; (For beginners this is not an essential tool but an option)
The Ruling Pen is designed for fine line drawing, technical drawing, cartography and calligraphy. It can also be used for making fine lines and borders in Indian ink, gouache, drawing ink and art masking fluid. The thickness of the line can be finely adjusted by turning the metal screw wheel. Just set the ruling pen to the required thickness and dip lightly in masking fluid. Remember to remove any surplus liquid mask off the pen once you have finished.
Any 2B pencil can be used to lightly plan out your tree structure and composition. Just make sure you keep your pencil nice and sharp. And keep a light touch whilst drawing. Do not press down onto the paper with too much pressure, this will just indent the paper and be hard to erase. For preparatory sketches a soft 4b pencil will be useful for sketching the different values and cast shadows. See below for some great starter pencil sets with a variety of hard and soft graphite options.
A small palette or white ceramic plate will do to begin your studies. If you only have the primary colours you will need to mix various earth and green hues to create your tree palettes, so look for a palette with small sections to place individual pigments and a larger space for mixing.
You will need masking tape to hold your paper in place or to create a border around your composition. Choose low tack masking tape so your paper doesn’t rip during removal.
Any good strong kitchen towel will work for soaking up excess water from your brush or for pulling off paint from your paper. Avoid the heavily patterned ones as they can leave their pattern mark on your painting.
Very mild soap can be used to clean your brushes gently or see below brush cleaner. To help the longevity of your brushes and to keep them in shape you should clean them thoroughly after each use. Never use boiling water, or leave them soaking in water for any length of time, this will ruin the wooden handle and bend the bristles, even synthetic brushes can get damaged in this way. Clean and then let them dry and always store brushes with the handle tip down and bristles at the top vertically or horizontally in a storage case.
You should aim to have two water-pots, one for diluting pigments and the other for cleaning your brush. Aim to have a heavy bottomed glass jars for your water so they won't move or be easily knocked over. Change the water often to avoid muddy colours.
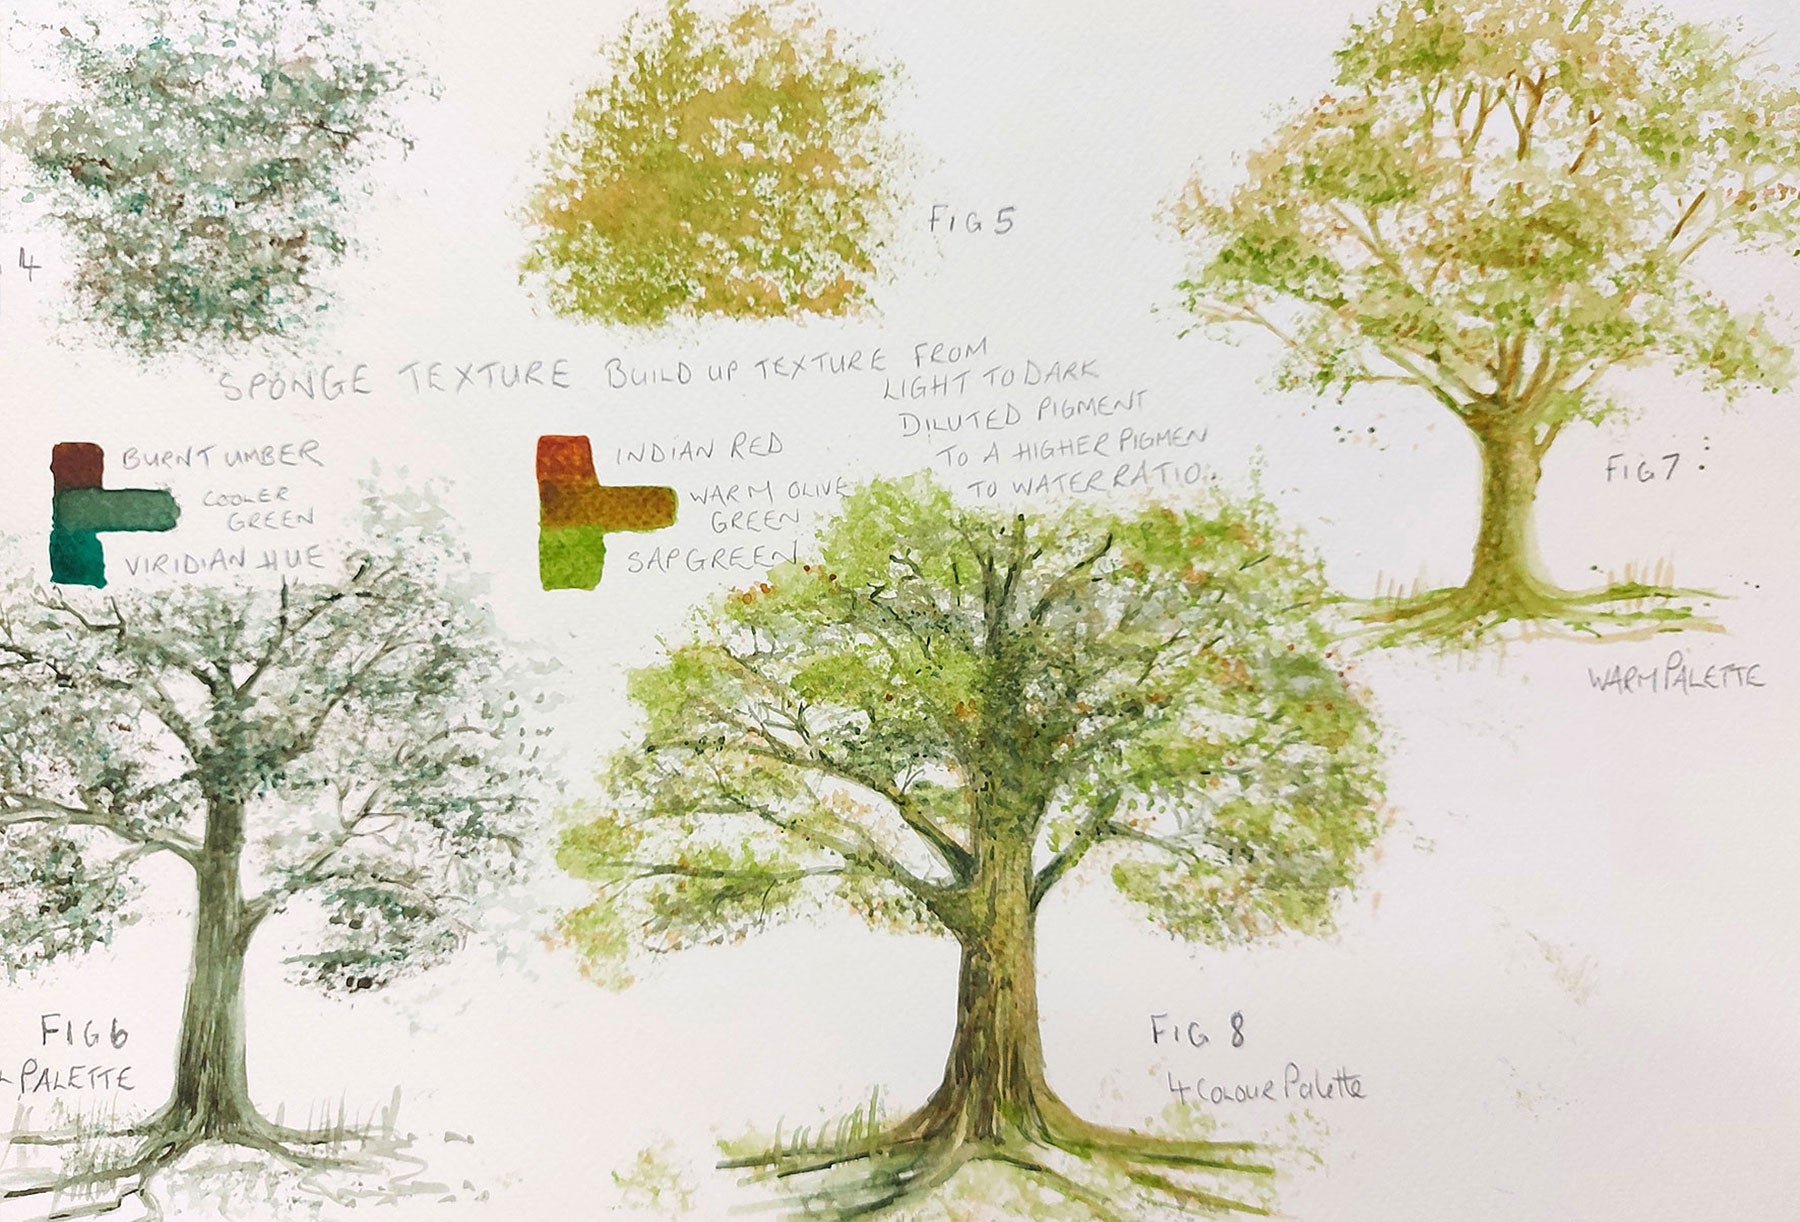
Small natural sponges are amazing for creating textural qualities in your paintings, from dry-wall details, rocks, sand, to foliage, leaves, bushes and tree canopies can all be created with these small sponges. Work your textures by starting with a highly diluted light texture then build up your layers adding more pigment to the water to darken your paint. Work light to dark and then you will always be in control of your image. You can work wet on wet for a more softer effect.
A good clean eraser that doesn't mark your paper is worth having in your tool box. They are useful for taking out graphite and charcoal marks and great as a drawing tool whilst doing your initial sketching prep, useful for creating tonal shifts and highlights on your tree's bark and foliage.
First important tip, always keep your watercolour brushes separate from your oil or acrylic brushes. Your watercolour brushes should only be used for watercolour painting. Many watercolour artists use pure Sable brushes as they are renowned for holding water and pigment and for smooth transitions on watercolour paper due to their softness and ability to hold their shape. Excellent for precision and detailing. However some artists would prefer not to spend a fortune on brushes as they are just starting out on their painting adventures and would also prefer not to use animal hair or blended brushes (synthetic and natural). Fortunately there are many alternative synthetic and vegan brushes on the market that have been developed to mimic animal hair brushes, keeping their point, shape, spring and synthetic brushes come in a variety of shapes and softness for watercolour painting.
A good selection of different size and shaped brushes will allow you to create detail and texture, so I would recommend you have several brushes at hand, see below for animal hair and synthetic hair watercolour paint brushes available.
A good selection of brushes to start off with would be; a mop brush, a fan brush, a round brush, and a rigger brush.
With brushes, here's the first tip, always keep your watercolor brushes separate from your oil or acrylic brushes. Your watercolor brushes should only be used for watercolors. Many watercolor artists use pure Sable brushes, as they are renowned for holding pigment and for smooth transitions on watercolor paper.
However some artists would prefer not to spend a fortune on brushes as they are just starting out on their painting adventures and would also prefer not to use animal hair. Fortunately there are many alternative synthetic and vegan brushes on the market that have been developed to mimic animal hair brushes, keeping their point and spring and synthetic brushes last longer!
A good selection of different size and shaped brushes will allow you to create detail and texture, so I would recommend you have several brushes at hand, see below for animal hair and synthetic hair watercolor paint brushes available.
A good selection of brushes would be; a mop brush, a fan brush, a round brush, and a rigger brush.
How do I store my brushes?
Keeping your brushes stored safely and regular cleaning will ensure their longevity.
What is a Fan brush used for?
Always really useful to have these brushes in various sizes - this brush will allow you to create foliage, leaves, grasses, used with dry brush technique it will allow you to create bark textures, debris, stone textures, soil and sand texture. Techniques used would be doting pigment, directional flicks or lines, small dabs, or dragging with a dry brush horizontally and vertically. Great for long and short grasses and distant textures.
Fan brush Synthetic
Fan brush Hog hair
How can I use my round brushes?
Round brushes are available in a variety of sizes and are extremely versatile. The larger sized rounds 10, 12, 16 are great for creating broad areas of colour, broad strokes and washes for skys, sweeping landscapes, horizon lines, painting large tree trunks, dropping in large pigment for wet on wet techniques, whilst the smaller rounds 00, 0, 1,2,3,4 are essential for small linear detailing and outlining. The medium rounds 5,6,7,8,9 are a great all rounder for everything else in between! The most cost effective options are the beginner sets as listed below, however there are many synthetic and Sable brushes you can purchase individually.
Round Brush: Synthetic;
Round Brushes: Sable; (the brush of professionals)
What are Rigger brushes used for?
Rigger brushes are used to create long linear lines such as branches, twigs, texture for long tree trunks, long blades of grass or distant thin spindly tree trunks. They are great for linear detailing vertically or horizontally.
Rigger Brushes: Synthetic;
Rigger Brushes: Sable;
What are Mop brushes used for?
Great for wet on wet techniques, laying down large wash areas, sky, fields and thick tree trunks. Acts like a Sable brush but fully synthetic. Available in various sizes. Mope brushes will absorb a lot of watercolour, water and inks, used for large areas.
Mop (Fine Goat hair) and Wash Brushes: (Squirrel)
Excellent spring and responsiveness, excellent pigment and water retention. Great for large and small wash areas, sky, fields and thick tree trunks. Available in various sizes.
Watercolour Brush sets: Synthetic
Below are some great starter sets to begin your watercolour painting studies.
Much planning and preparing goes into a serious commission before artists begin to paint. Employing the same strategies as a professional artist will help you as a beginner to develop your skills quicker. The first task would be to sketch ideas, shapes, textures, practise color-ways, decide on your watercolors. Sketching trees outside can be difficult when the sun shifts and moves throughout the day, or the weather changes from fine to inclement! It is useful therefore to take some of your own photos and make quick sketches on site before you start painting trees.
Collecting good clear images and creating a number sketches, will help you think about your themes and composition. Rehearsing shapes, values and textures in pencil before you change to a paint brush will ensure your work has a sensitivity and a likeness of your subject. Start by concentrating on a single tree rather than a whole forest to begin with. Also by rehearsing the lightness of pressure used with your pencils, this will teach you to use more control when it comes to painting with the different watercolor brushes. Always only use light to medium pressure.
Working from your tree photographs, consider;

Once you have spent a little bit of time drawing and studying your chosen tree, you will be familiar with the shape and texture, and have captured where the dappled light falls. If your tree has little or no foliage it is probably a winter tree where the light is grey and the weather is inclement and cold. To describe these cold conditions when painting trees, a cool palette would help capture the mood of your tree well.
If your tree has a little bit of foliage or a full canopy of leaves maybe the image of your tree has been taken in spring or summer. You could use a warmer greener palette for this tree painting.
I have only used two pigments for each of the first two studies to illustrate how easy it is to create a tree and its mood using a limited palette.
The third study Fig 3 has been painted with all four colors. You can come up with your own two colors to work with as long as one is a green colour and one is a brown or red. These complimentary colors provide a good base for earth and neutral tones. These limited palette examples are just to get you started, once your confidence levels have improved you can use any palette that you prefer. However a good rule to follow would be not to mix more than three watercolour pigments together as your results may become muddy or grey. The more colours you mix the less vibrant they become. If you need to darken your image you can just lay the same pigment over the top wet over dry technique. To lighten just remove with a clean brush or paper towel.


Some additional techniques you can use;


Comments will be approved before showing up.

MEEDEN is a company known for providing high-quality art supplies and tools to artists and enthusiasts. They are committed to inspiring creativity and supporting artistic endeavours through their range of products, which include Easels, Artist Supplies storage drawers, Table Easels, and Artists’ Print rack with castors.


Anne Wilson
April 06, 2021
Very comprehensive tutorial. Fantastic.