
Your Cart is Empty

HOW TO GET FESTIVAL READY!
Part 2
Creating your very own bespoke festival wellies and accessories!
In part one of our “Let's get Festival ready” blog we discussed lots of great products which can be used to create your very own bespoke accessories so you can stand out in the crowd.
During festival season we know how changeable our British weather can be! We can have showers or hail in the morning then bright sunshine in the afternoon! Or vice versa! Your wellies need to stand out and look great for all occasions and all weather conditions.
This blog will guide you through what to consider whilst creating your own ‘Trendy’, Neon Festival Wellies and accessories! There is sooo much inspiration out there on the highstreet, this year's fashion trends include back to the late 90’s and early 2000s with the latest Y2K fashion hits, or create your own psychedelic inspired wellies! Organic and morphing shapes means anything goes!

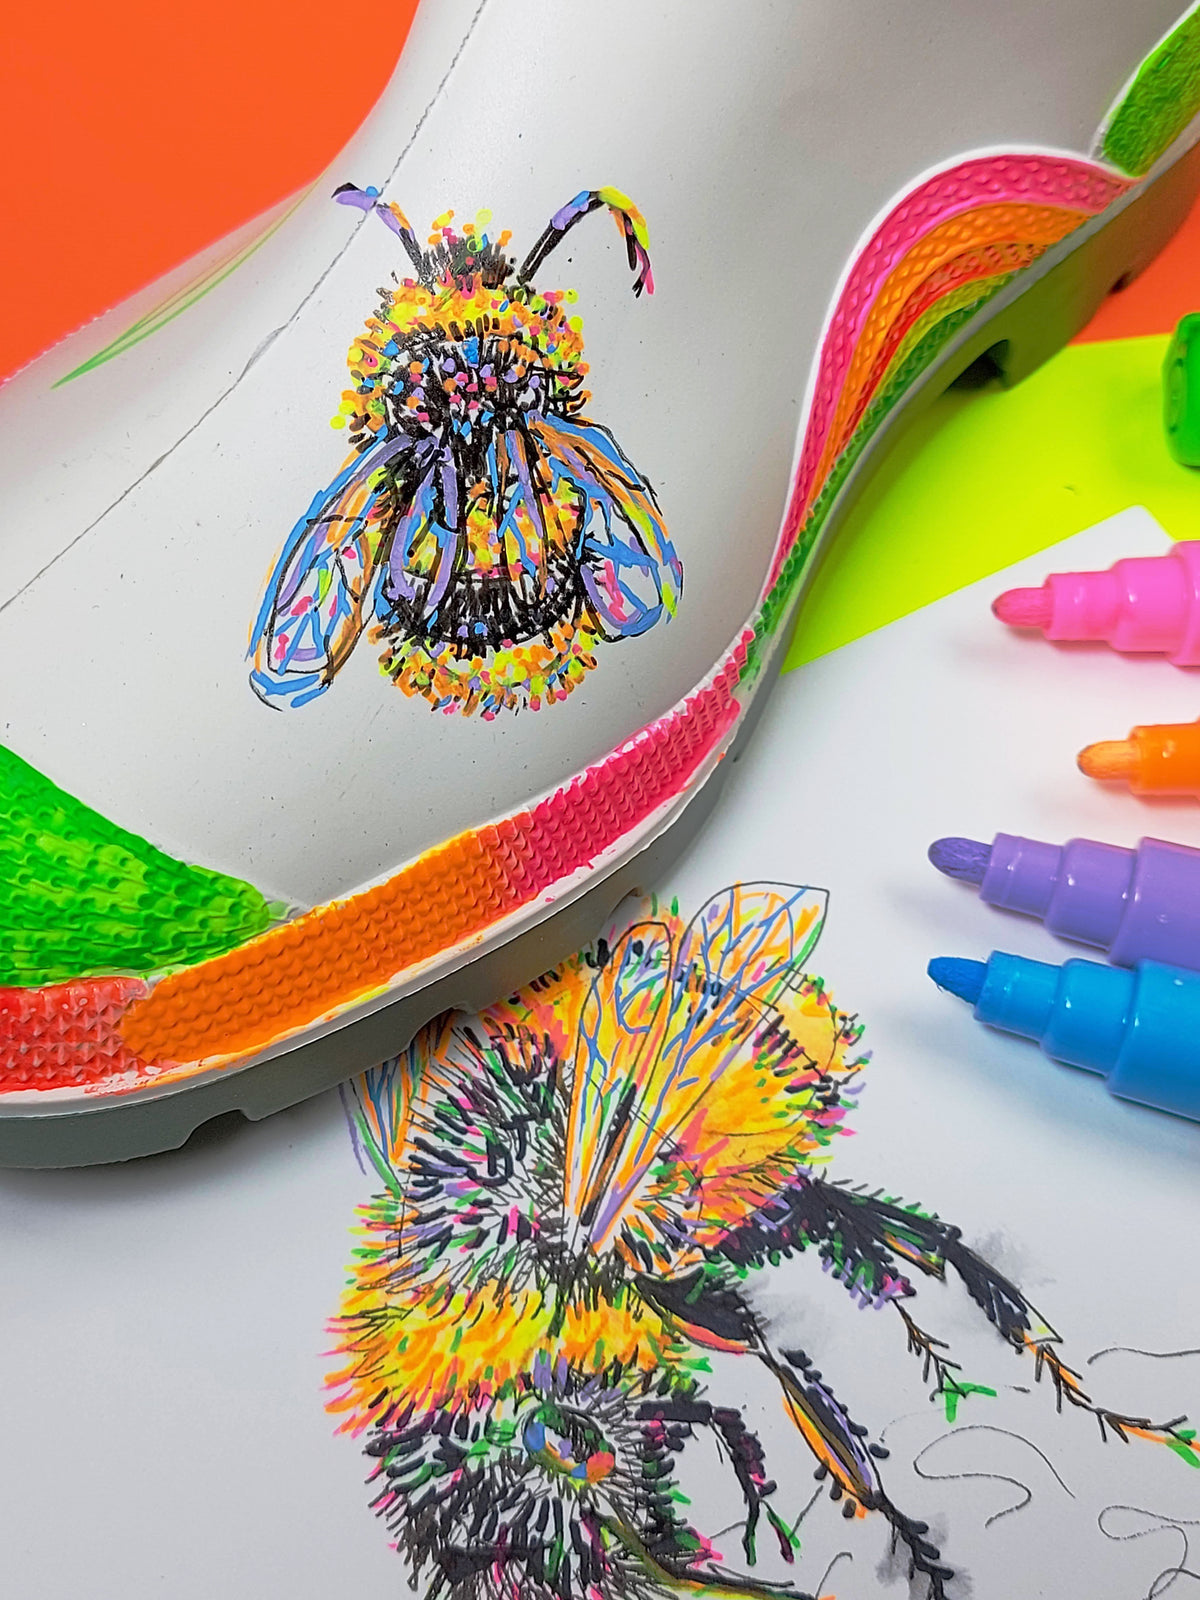
The Festival Wellies we created celebrates the countryside, wild meadows and our beloved bees! With slogans, Bee Happy, Bee Green, Bee Kind!
Let's get started!
Firstly choose a pair of Wellies that are comfortable to wear all day long, update, or upcycle a pair you already have or think about buying a black or white pair for a bare canvas. After you have painted your Wellies and are in the creative ‘Zone’ think about accessorising with a matching tote bag and water bottle. And the fun is not just for adults! Why not create matching wellies for your little creatives too? Your children’s wellies could match yours? Or they could design and paint their own! It is all possible!
Below we have listed what you will need to create your masterpieces.

What you will need!
1. Comfortable pair of Wellington boots, plastic or rubber, when choosing your wellies make sure you have room for thick comfy socks!
2. Soft Synthetic brushes in a few different shapes and sizes, eg. no 10 flat, no 8 filbert and no 6 and 10 round. Below are a few of our sets.
- ARTdiscount Acrylic Brush Set of 5 Brushes
- ARTdiscount Watercolour Brush Set of 5 Brushes
- ARTdiscount Artists Value Profile Brushes - Round
- ARTdiscount Artists Value Profile Brushes - Flat
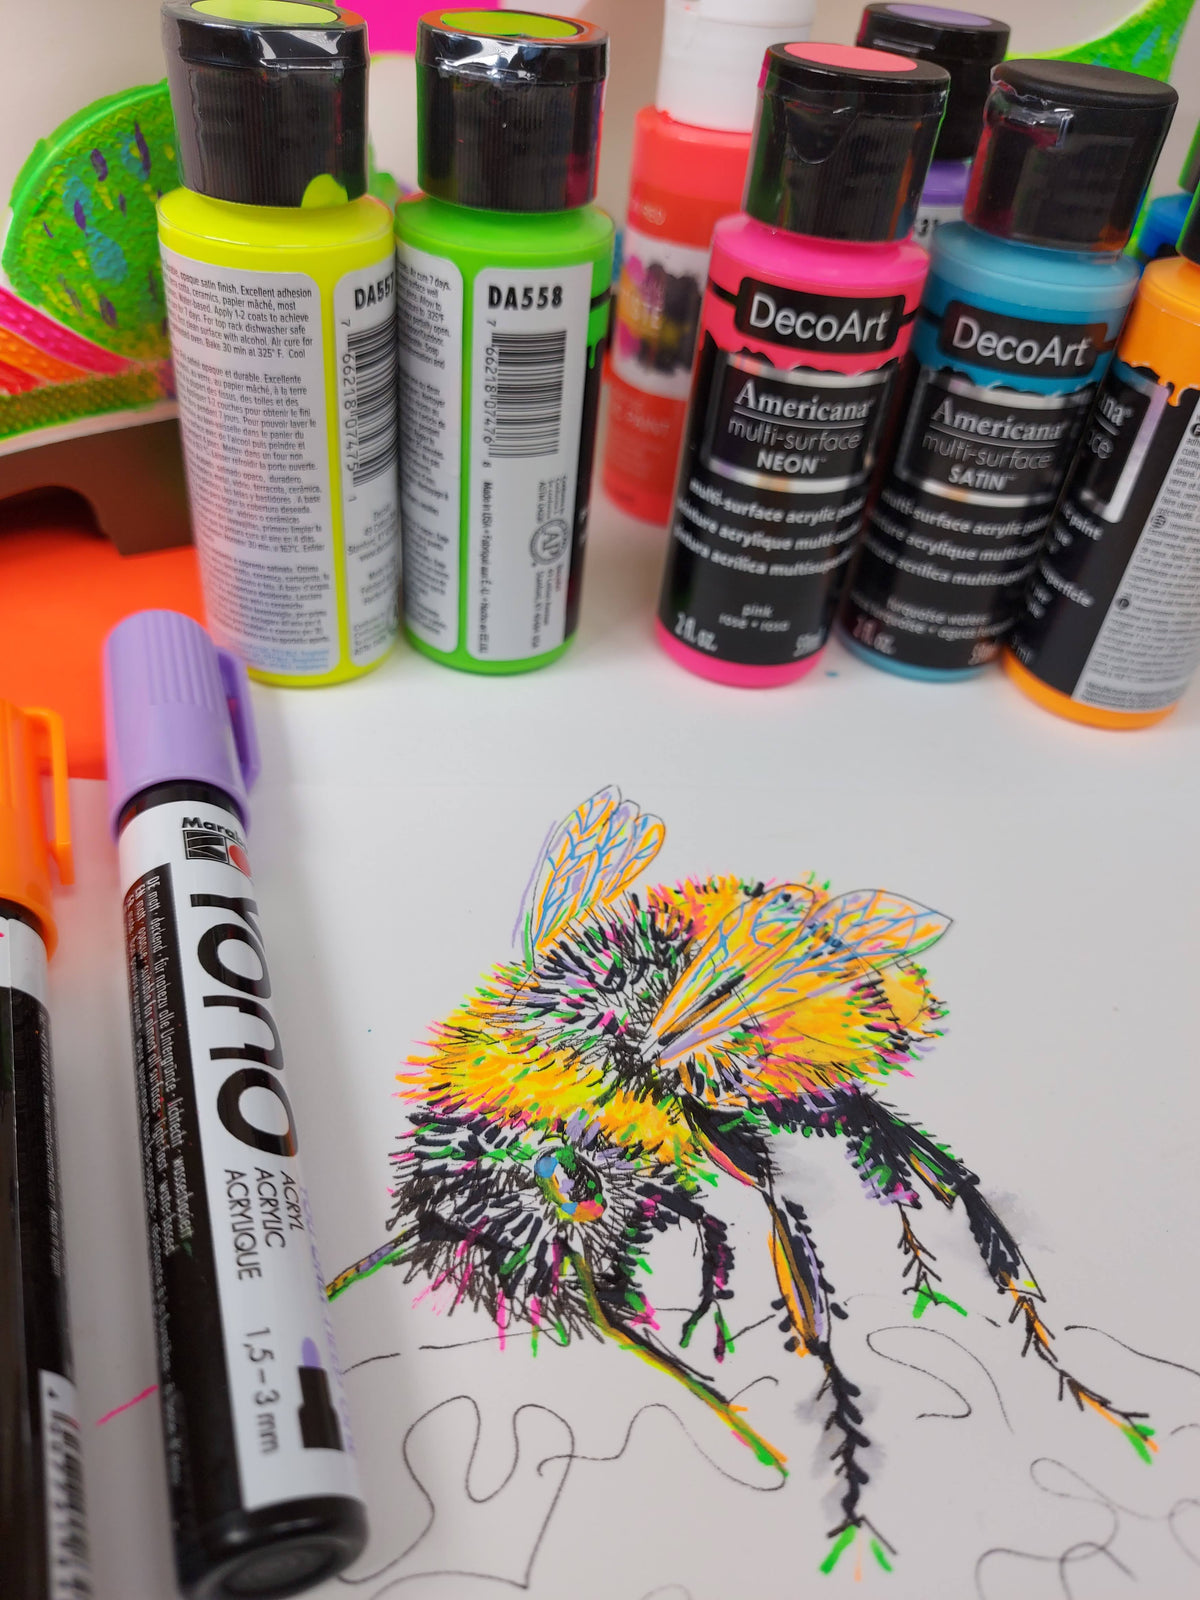
3. Acrylic paint that is suitable for all surfaces including rubber.

Americana Multi-Surface Premium Acrylics- 59ml
You can use this premium, satin, indoor/outdoor acrylic on almost any surface including most plastics. They are self-sealing, so no primer or varnish is required and they offer excellent coverage in one to two coats.
This special formula is designed to brush out smoothly and once fully cured, creates a durable, hard finish that is highly resistant to cleaning chemicals.Multi-Surface comes in 70 vibrant colours that offer excellent coverage in one or two coats.
- Superior flow and levelling
- Acid-free
- Intermixable colours
- Permanent, lightfast pigments
- Soap and water clean-up
- Water-based and non-toxic
- Manufactured in the USA
Paper | Canvas | Wood | Plaster | Air Drying Clay | Heated Ceramic | Glass | Styrofoam | Most Plastic | Fabric | Masonry | Walls | Metal | Terra Cotta
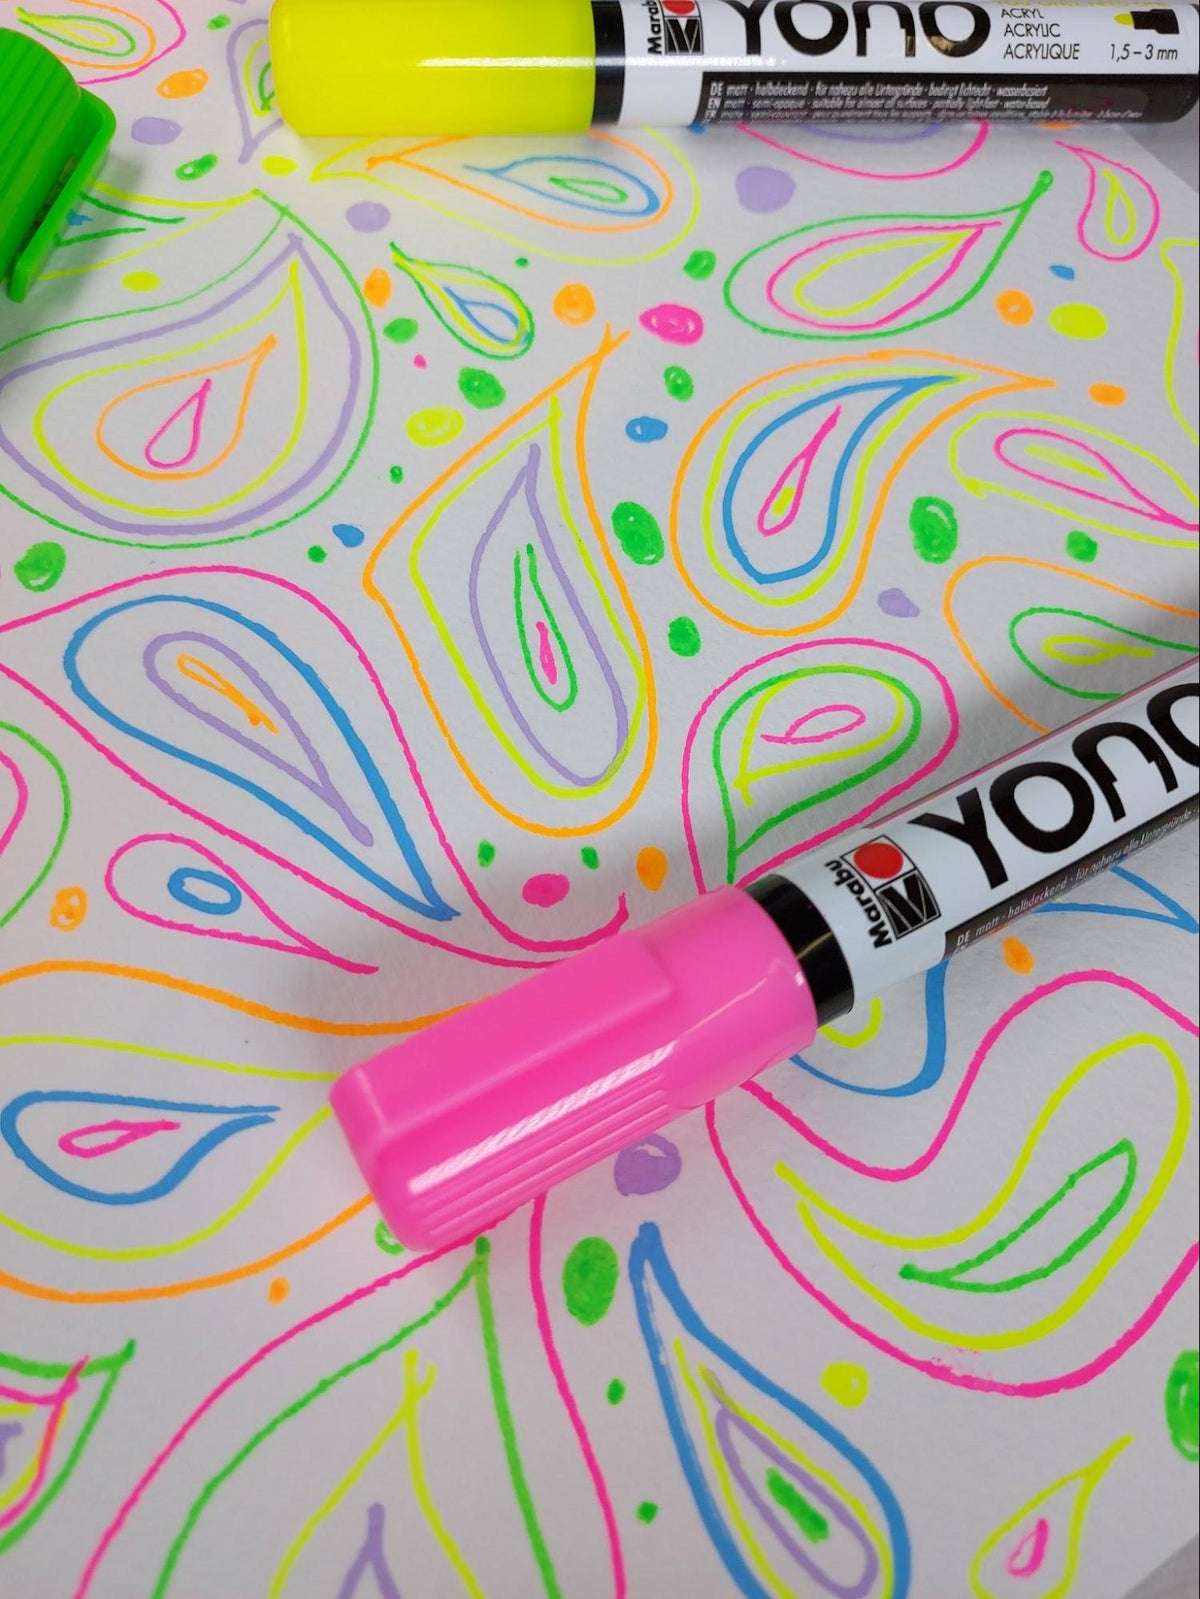
4. Markers for fine detail and to use for outlining your designs or abstract shapes or for writing your favourite lyric or poem onto your Wellies!
Marabu Yono Markers set of 4 Bullet Tip (1.5-3mm) - Neon
YONO is the opaque acrylic marker for almost all surfaces. Let your ideas run wild, think big. The rich matt colours have just as few limits as your creativity. Bring your ideas to light and show your environment what's in you. The water-based and light-fast colours offer you all possibilities. No matter what task you want to implement – YOU ONLY NEED ONE
Contents: 4 x YONO Marker 1.5-3 mm (Neon-green 365, Neon-yellow 321, Neon-orange 324, Neon-pink 334)

Step by step tutorial
This is how we achieved great results with our Festival Wellies! Follow the guidelines below and you can’t go wrong! If you do have some happy little accidents then they are meant to be part of your design!
Prepare the studio space or kitchen table
- Create a dust-free, clean space in which to work and protect all your surfaces. Maybe wear an apron to protect your clothing.
- Have a small water pot at hand, maybe a water spray, lots of paper tissue for mopping up and for cleaning brushes. Top tip, cotton buds are great for cleaning small and tricky edges of your design, dip them in water before tidying up the edges. If you want to create some texture in your design, have some synthetic spongesat hand also.
Prepare your wellies, water bottles, tote bag, etc...
- Make sure your Wellington boots are clean and grease free, wipe down with a clean damp cloth. All non porous and hard surfaces should be clean and grease free, this will allow the paint to adhere to the surface. Gentle soap and water and a damp lint free cloth will be fine to use. When painting onto fabric, wash the fabric first to remove any size.
- When painting onto fabric make sure you have a piece of cardboard in between your bag or t-shirt to prevent bleeding onto the fabric layer below, don’t dilute the colours, work with the colours straight out of the pots. The. The acrylic markers and the AMERICANA MULTI-SURFACE PREMIUM ACRYLICS - 59ML paints work really well together on most surfaces, fabric, plastic and rubber.
Prep your designs and motif!
- Before embarking on painting your Wellies, aim to practise drawing and painting several different designs and colourways to make sure the scale of your designs are right for your boots. Working on plain white or black boots provides a good base for a design. Prepping designs in this way is a great rehearsal for mark making and colour mixing. Remember your wellington boots are round so your designs have to wrap around successfully to look right. You can do this by practising on a piece of paper and then taping the paper design around your boot before committing to the final design!
- Decide where you are going to start! We started by painting the toe of the boot Green, then the rainbow and then all around the top, back and bottom of the boots, giving the boots a great border design. This helped whilst planning the scale of the flowers, hearts and bees.

Techniques you can use...
- If you aren confident at free hand painting, aim to use some cut out stencils. Just normal photo copy paper can be used to make the stencils as the paper is thin and will bend around the boot easily. Print out your favourite flower or shape several times in various scales and cut out some petals and the stem. Use a soft brush or sponge dipped in the paints, you will need to let each layer dry before you apply the next. Make sure you cover all the areas you do not wish the paint to go. Sponging different colours on each of the layers is a fun way to create a glowing Neon texture. You can add detail with the Yono markers when the paint has dried.
- Or Use the marker pens to create outlines then block-paint in all the areas you want to colour. The two products we have listed work really well together as they both provide the same shades of neon colours. AMERICANA MULTI-SURFACE PREMIUM ACRYLICS - 59ML and MARABU YONO MARKERS set of 4 Bullet Tip (1.5-3mm) - Neon. The paints don’t need to be diluted and can be used straight out of the tubs.The paints can be intermixed to create new colour palettes. Let each layer dry before adding another layer, a hair dryer can be used to speed up the drying time.


Helpful tips...
- We used two old cardboard tubes in our Wellies to aid in the painting process and to stop the wellies from folding flat, this makes painting much easier. Old rags, towels or paper would work also, just stuff them in the boot from the toe to the top.
- Shake all paints vigorously before you set them out on your palette, this will ensure the pigments and binder are mixed well. We used Winsor & Newton Disposable Tear Off Palettes (9" x 12")and it worked a treat! No mess and no cleaning!
- Don’t forget to clean your brushes straight away, acrylic paint dries waterproof and can ruin your brushes if left to dry.
- We worked on both Wellington boots simultaneously, so while one boot was drying the other boot was being painted.
- Get a nice, even finish on slick surfaces like glass and metal by using a soft brush to spread out multi-surface paint, then leaving it to self-level.
- Use a light touch on slick surfaces for better coverage. Pressing too firmly with the brush can cause paint to slide off the surface.
- For an eggshell finish, use a high-density cosmetic sponge to tap the paint onto the surface. This technique will also give your base coat "tooth" that makes it easier for additional coats of paint or painted designs to adhere.
- No primer or sealer is needed before painting or to protect the finish afterwards.

Aim to practise drawing and painting several different designs and colourways to make sure the scale of your designs are right for your boots.

Cardboard tubes to aid in the painting process and to stop the wellies from folding flat.
We hope these tips will help you create your Festive ready accessories, and we wish you happy creating! If you can share your photos with us on instagram! Please Tag us @ARTdiscountofficial and use #ARTdiscountfestivalready, #colouringthenation, we would love to see all your crafty handywork!