
Your Cart is Empty

Monotype and Monoprint Art Printing
What is monotype or monoprinting you ask?
Monotype, as its name implies, is a form of Art printing where only a single impression can be made, a unique one-off edition print. You can take multiple impressions whilst the ink is still wet, but no two prints will turn out the same. Monoprints are also known as Monotypes, the two words are often used mutually to describe the same process and similar techniques, with monoprint being the more common and generic of the two. Some distinguish the two related printing techniques by suggesting monoprints have a repeatable capability whereas monotype prints are one-off prints.
Monoprint and Monotype are a direct and immediate form of printing. They incorporate elements of drawing and painting, with an immeasurable amount of opportunities for experimentation and creative discovery. Monotype and monoprinting techniques are diverse and incredibly versatile, and can involve combining other printing and multimedia techniques such as block printing, etching, woodcut, collage, painting and drawing.
There are many monoprinting/monotype techniques artists use, most of them very easy to replicate. We shall cover these techniques in this article and provide you with all the information you need to purchase the right tools and substrates to print onto.
Monoprinting/ Monotype can be accomplished in a studio or on your kitchen table due to the range of non-toxic, water based ink now available, no dangerous chemicals needed and you do not even need a printing press! Also unlike screen printing which forces ink through a screen, you are painting or rolling ink onto a flat printing surface. Once the printing slab has been inked, you can either manipulate the ink then place your paper down onto the ink to impress the image onto the paper or lay your paper on the untouched ink and create your image by working on the back of the paper.
Monotype and Monoprinting are known as Planographic printing, which basically means printing from a flat surface. Relief printing has a raised surface and Intaglio printing has an incised surface.
Professional print artists may use oil based printing ink and a printing press. Once you have become familiar with the process and want to discover more, or further develop your practice, you can convert any oil paint you already own into printing ink by using Daler-Rowney Adigraf Oil Block Printing Medium. Similarly you can convert any Acrylic paint you own into block printing Ink by using Daler-Rowney Adigraf Acrylic Block Printing Medium - 250mland Daler-Rowney Adigraf Drier Medium 250ml.

What equipment do I need for Monotype/Monoprinting?
All the tools;
- A flat, clean, scratch free surface slab/matrix, like a sheet of glass, acrylic, acetate, or plastic or even a Formica or metal surface will do. Gelli Arts- Gel Printing Plates are also a good surface to work onto using acrylic based paints as they are a gelatin plate which is a reprintable block.
- Block Printing inks or acrylic paint (any acrylic paint colours will work well) with a block printing medium such as Adigraf Acrylic Block Printing Medium.
- Brayer or Ink Rollers at least two, one used for the ink and the other to use clean on the back of the paper when pressing down onto the inked plate. The more rollers you have the more colours you can use, as ideally you will need one for each coloured ink.
- Kitchen paper towels or rags for cleaning up after printing and for lifting ink off your plate for a reductive technique. A soft rag bunched up into a soft ball can also be used to apply pressure onto the back of your paper, transferring the ink from the plate onto the paper, move in a circular motion with medium to hard pressure.
- A range of different drawing tools, thick and thin; pencil, biro, chalk, graphite stick, crayons, kabab stick, toothpicks.
- A range of different coloured and/ or different weights of papers, smooth in texture will work best, old maps, old book pages, tracing paper, photocopy paper, printing paper, Hereford Block Printing and Etching Paper, cartridge paper anything between 80gsm to 145gsm ARTdiscount 100gsm All Media Cartridge Paper - Packs of 250 sheets.
- Ink trays/ inking palettes are optional if you have a large printing area which you can use?
- Scotch masking tape, for demarking your printing area and for attaching your paper to the printing area.
- Optional, a colour shaper is a great tool for lifting off or moving ink on the slab and for mark making without scratching your surface. Pro Arte - Colour Applicators Flat Chisel, or Pro Arte - Colour Applicators Taper Point.
- Plastic Palette knife or knives for mixing paint with Adigraf or to use when creating tints and tones of new colours, or use them to make marks on your inked surface? Use a plastic knife, not metal so you don't scratch the surface of your printing plate.
- Optional Catalyst by Princeton Silicone Blades and Catalyst Contoursare great for mark making in your ink before printing and there are lots of different tools to choose from.


Additional materials; texture tools and mark making tools found around the home
All of these items below can usually be found in the home or on your daily walks. They all make really interesting textures and marks; press leaves into your ink before printing to create shape and texture, or leave them on the plate to create a stencil. Press textured wallpaper or sponges into the ink before printing to create interesting textures.
You can draw into the ink with kebab sticks or toothpicks for that ultra fine line work, great for details or you can use them on the back of the paper to trace a line or make a mark. The only thing to remember is not to use anything that is very sharp as it may scratch your printing surface/plate/matrix permanently.
- Bubble wrap
- Corrugated cardboard
- String and cotton
- Leaves and sticks
- Cotton buds
- Kebab sticks
- Tooth picks
- Odd bits of raised textured or patterned wallpaper for creating texture on the printing slab/matrix
- Small bits of card
- Old newspaper or old book pages to print onto

Monoprinting and Monotype printing guidelines
Mono prints are a really easy form of printing which you can do as a beginner or professional. Our young creatives will also love monoprinting because the techniques are fun and easy.
The basic principle behind monotype printing is that ink is rolled out evenly with a roller or painted with a brush onto your printing slab/matrix. An Image can be created in the ink before paper is placed onto the inked surface or an image can be worked on the back of the paper placed on top of the inked surface. Below is a step by step guide to help your first printing adventure.
Let's begin!
Preparation of equipment and Health and Safety first!
Prepare your equipment and have everything at hand. Make sure your printing surface and surrounding environment is clean and dust free.
Wear suitable protective clothing as even water based acrylic paint can damage your clothes. Aprons such as Mapac Artists Apron and gloves are recommended.
Choosing an Image to print
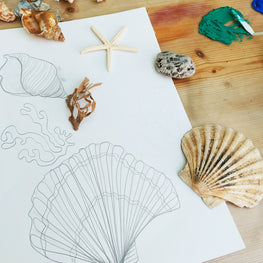
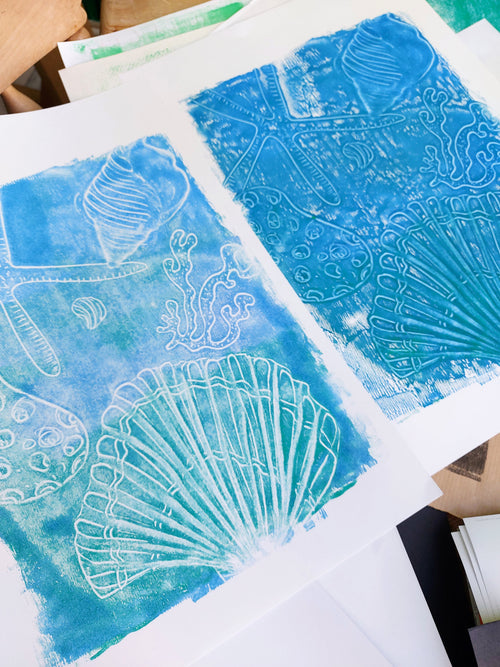
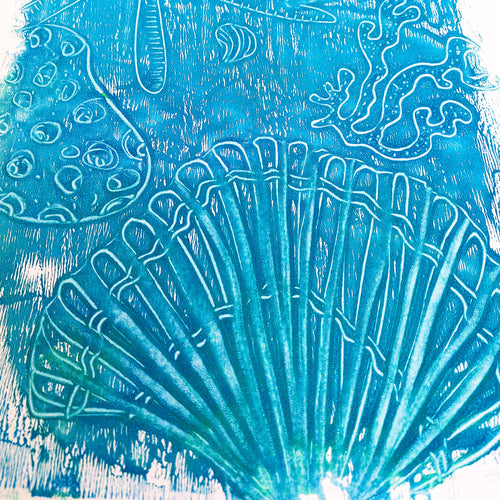
Choosing your drawing and printing themes; if you are just starting out, or are working with your young creatives, choose easy shapes first, like shells, leaves, seaweed, then develop to more advanced themes for example florals, figures, landscape, animals, trees, or just create abstract patterns and textures etc. Use a photocopy of your image/photograph or have a copy of your drawn image ready, don't use your original design/drawing as you will be tracing over it.
A good point to remember when monoprinting is the image is always reversed, so if you wish to print any letters or numbers they will have to be copied in a mirror image format first.
Deciding on Scale and marking out your printing area
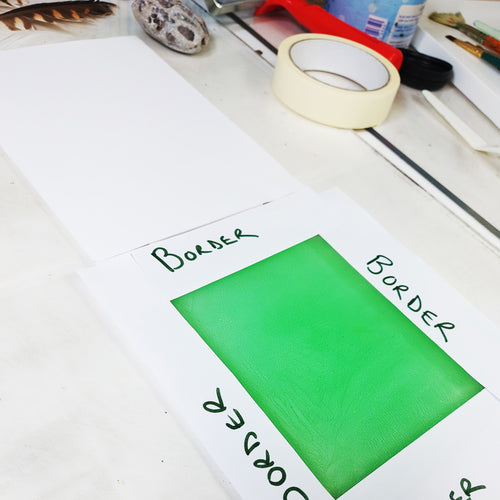
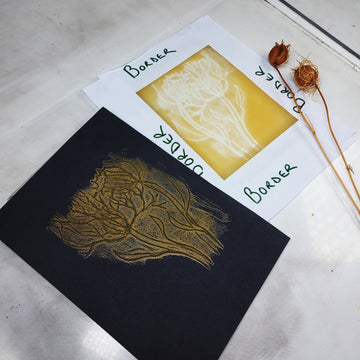
If your image is an A4 size (21.0 x 29.7cm), using masking tape mark out a rectangle shape on your printing surface using these dimensions, landscape or portrait, depending on your image. Aim to print your A4 image onto A3 paper so you can have a good clean border around your image. After marking out your A4 printing area mark out your A3 paper scale also, so you can lay down your paper in the same place for registration every time you print.
Mask either on top of your Perspex if you are using an opaque slab/matrix or if you are using a transparent printing surface then turn your slab over so the tape is underneath, this way the tape won't get covered in ink and this will help you to register your design or image for multiple monoprinting techniques.
Paper borders can also be used to prevent leakage of ink and keep your printing paper clean.
The inked area should always be smaller than your paper. Top Tip when you have finished printing, wash your slab/matrix and remove the masking tape straight away. If left to dry the glue from the tape will be really difficult to remove.


Inking surface; your slab/ plate/ matrix
If you only have a small printing surface you can roll your ink out onto a separate inking tray first, printing ink is slightly thicker and tackier than normal paint. If you have mixed your acrylic paint with a printing medium like Adigraf make sure you have combined them thoroughly.
Roll out your ink several times back and forth on your inking tray/palette or to the side of your printing area if you have a large plate, until it slightly changes in consistency from thick glue to a more smoother and more velvety consistency.

Work your roller over your inked area a few times until your ink is nice and velvety smooth in texture, remember you do not need a lot of ink. Once it has changed consistency it is now ready to be transferred onto your printing area marked out with tape.
Rolling your ink away from your printing surface first, will allow you to pick up just enough ink to then put down onto your demarcated printing surface, leaving most of the excess ink behind in the tray.

Applying your Ink
Once you have demarcated your printing area with tape, and loaded your roller with ink, proceed to apply your ink onto your plate. Work your inked roller over the surface a few times until it is nice and smooth and velvety in texture.
Don't apply too much ink, and keep within the area masked off with tape, the outer area will be your clean border area.
You can also use a paper border on top of your inked surface to keep your paper clean, the wet ink will adhere the paper border to the plate. Just use copy paper for your border paper. Discard straight away when you have finished printing as it will stick to the plate if left to dry.

Choosing your paper
Select the paper you wish to print onto, you can basically use any paper for monoprinting, but one that has a smooth tooth, flexible and slightly robust will allow you to print on it several times or over it if you are trace printing. Hereford Block Printing and Etching Paperis a good paper to use or any cartridge paper between 130gsm to 150 gsm. Good quality copy paper can be used at least once.
However if you are being adventurous you could use dyed paper, old book pages, old pattern pieces and maps make interesting backgrounds.


Once you have completed creating your image and you feel that the ink has transferred successfully, carefully peel off your paper and lay it somewhere clean and flat to dry.
Registration and Mark Making
For consistent registration whilst printing, create a masking tape hinge. Tape your paper to the top of the demarcated printing area. The tape acts as a hinge so you can lift up your piece of paper to check your design and place it back in the same place.
The heavier the pressure used with any of your line making instruments, the darker the mark, so try to keep fingers or the side of your hand from resting on the paper as you draw. Use the borders around the inked area for support or use ARTessentials Acrylic Hand Rests .
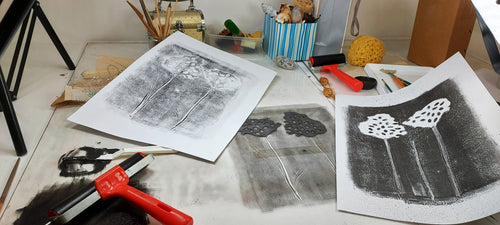
Linear Trace Monoprinting techniques
Linear trace monoprinting technique is an easy technique to follow as you are either tracing over a copy of a photograph or a copy of your own original drawing.
Once the printing plate has been inked and your printing paper is in place over the ink, lay your image to be traced over the printing paper and secure at the top with a piece of tape and you are ready to go.
If you wish to create interesting variations of line, use different implements to draw with; pencil, biro, chalk, crayon, tooth pick or kebab stick and use different levels of pressure to create different marks.
Additive techniques
The additive method simply means, adding layers of paint onto the printing plate with a brush or other soft implement. You can create a whole print by placing an image under your transparent Perspex sheet or glass to use as a guide, then apply ink with a variety of brushes or sponges to create texture or with a plastic palette knife to achieve the desired effect on your blank paper. Also with this technique you don't need to cover the entire surface with ink, only paint it in the places you choose.
You can also use this additive technique after you have printed your image but want to develop it further. You can use the subtractive method in conjunction with the additive method when you become more confident with your printmaking technique.


Subtractive or reductive techniques
A subtractive or reductive method can be used when creating negative painting techniques. Instead of painting the shapes, the ink is removed from your inked slab/matrix before you transfer the image onto paper. The printing ink can be removed using items such as a rag or a soft brush, bubble wrap or cotton buds to create interesting textures.
Ghost printing
This simply means after the initial linear image has been traced and lifted off as a first print, a second paper can be laid down over the ink and a second print can be taken from the left over ink on the plate. The result will be a lighter version as there will be less ink on the plate. The outcome of this ghost print is usually the negative of the first image.
Before laying down your piece of paper for a second time over the ink, you can draw back into the ink to develop the image further or draw on the back of your piece of paper to develop the image.
Using Stencils
There are many papers that make a good stencil for this kind of monoprinting, thin photocopy paper can easily be cut into, and sharp shapes can be created using a craft knife on a cutting mat. Unfortunately they can only really be used once as the paper will disintegrate once lifted off the plate.
Special stencil paper will last longer and may be used several times. Sheets of acetate can also work well, as it is easy to cut and can be used many times over. Glossy magazine paper is also great to use as stencil, but can only be used once.
Ready made stencils may be found around the house for example, paper doilies, bits of old lace, plastic cut out craft ribbon etc...
Organic materials such as leaves and petals and soft stems can be used as stencils.
Equipment for cutting out your own stencils


Advanced Monoprinting Techniques
Chine Colle - Before monoprinting, tissue paper is glued down onto the substrate (heavier paper) and left to dry, you could use different coloured tissue papers to your image or thin book pages, sheet music, maps, dress pattern paper? this technique provides a two-layer paper support for your image and could make for some interesting outcomes? This technique originated from China and Japan.
Multi coloured monoprinting - there are two ways to create different colours, one would be to roll different colours on top of each other on the plate, or roll two colours at the same time with your roller, half and half, then transfer the colours onto your plate/slab.
Using the additive technique you can brush as many colours as you wish onto the plate before printing.
Cartridge and Watercolor paper for monotype printing
- ARTdiscount Cartridge Paper Pack A1 - 25 Sheets
- Hereford Block Printing and Etching Paper
- Frisk Cartridge Paper Pad 150gsm 30sheets
- Frisk Black Mixed Media Paper Pad 250gsm 30 Sheets
- Seawhite All Black Paper Starter Sketchbook
- Clairefontaine Carb'On Black Paper Artist Sketch Pads
- Frisk Essentials Black Paper Pads - 135gsm - 30sheets
- Seawhite Tropical Coloured PAPER A3 - 10 sheet pack
To conclude
We hope you have found this guide useful and helpful, and are now inspired to create monoprints using various techniques and other methods detailed above. Remember to stay curious and as we suggested at the beginning of this blog, you can create an original image and develop different Art prints very easily with inexpensive equipment and household items.
Good luck in your creative adventures and remember to share your work with us on Facebook or Instagram.